To properly prepare a garage floor for a professional epoxy coating, thoroughly clean and degrease the slab, diamond-grind the surface to open its pores, repair any cracks or pitting, and conduct a professional moisture test. Many homeowners look forward to upgrading their garage with a sleek, durable finish, only to watch their DIY coating bubble and peel away within a single season. The hard truth is that an epoxy floor is only as good as the concrete underneath it, and no product can make up for poor surface preparation.
At A1 Concrete Coatings, we treat this prep work as the most critical stage of the entire garage floor coating process, ensuring the concrete is mechanically ready to accept an unbreakable chemical bond. In this guide, we’ll walk you through each step of the professional preparation process so you know exactly what to expect.
Why Garage Floor Prep Makes or Breaks an Epoxy Coating

Epoxy bonds by gripping the microscopic texture of bare concrete. When that surface is contaminated or too smooth, the coating has nothing to hold, so it lifts under hot tires, foot traffic, and freeze-thaw movement. This type of premature peeling drastically shortens how long garage floors last and ruins your aesthetic investment. Three things sabotage a bond more than anything else: surface dust and laitance, old sealers or paint, and moisture rising through the slab.
Garage concrete in Northern Illinois faces all three, plus the road salt and oil tracked in all winter. Professional prep removes those barriers and opens the concrete’s pores so the epoxy keys into the slab. Skipping it is the single most common reason a garage floor coating fails early.
The Steps to Prep a Garage Floor for Epoxy
Done right, garage floor prep follows a sequence, and each step sets up the next. A1’s installation process builds these stages into every job:
- Clear and clean: empty the floor, then degrease to pull out the oil and grime the concrete has soaked up
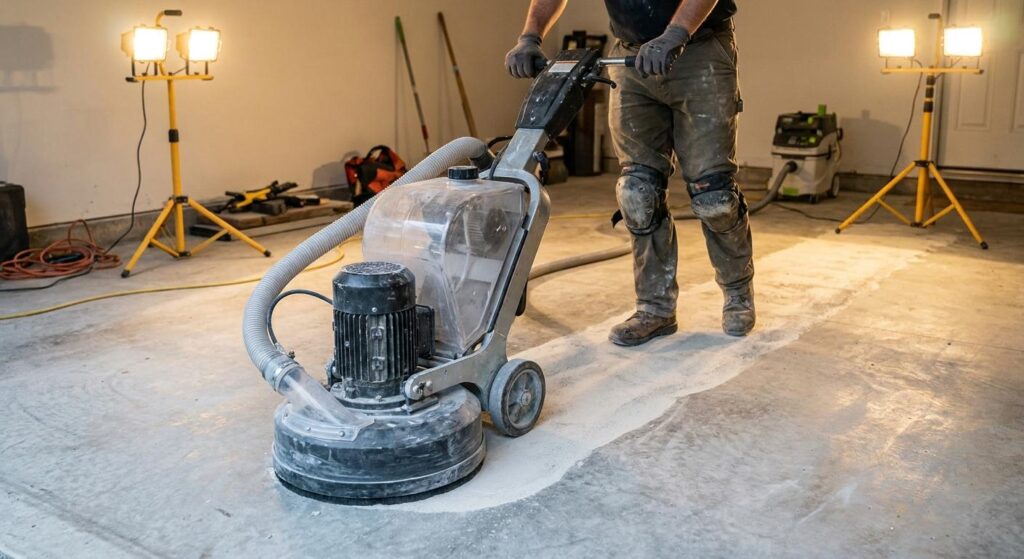
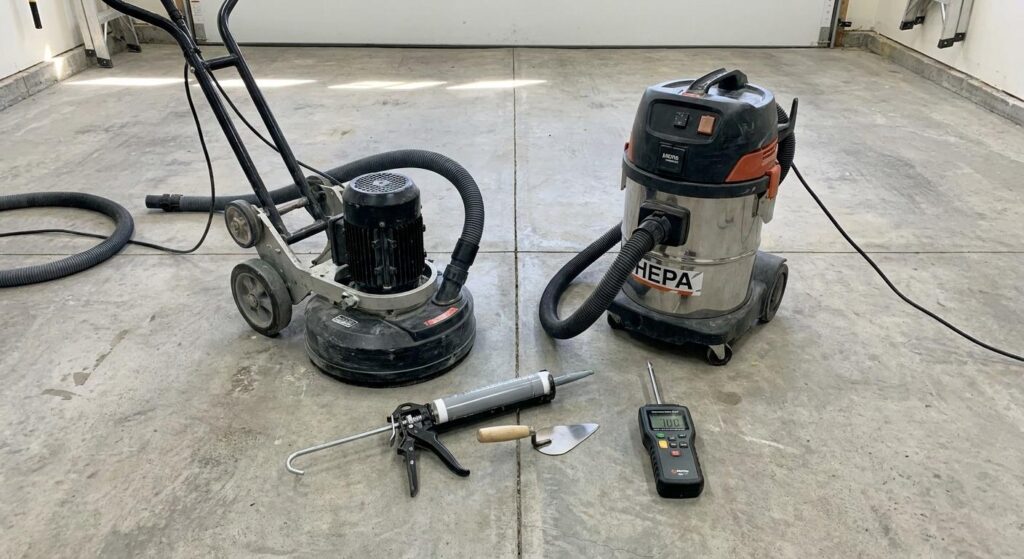
- Diamond grind: profile the slab with diamond tooling, removing old coatings and laitance and opening the pores for the epoxy
- Repair: fill cracks, spalls, and pitting with patching compound so the finished surface is flat and sound
- Moisture test: check the slab for vapor drive that would push a coating loose, and add a vapor-barrier primer if the readings call for it
- Vacuum and tack: remove every trace of dust so nothing sits between the concrete and the first coat
Why Most Homeowners Leave Prep to the Pros
The gap between a DIY prep job and a professional one usually comes down to grinding. Renting a grinder is possible, but matching the right diamond tooling to your slab, controlling the dust, and reading moisture correctly take experience most homeowners don’t have. Get the profile wrong and even a premium epoxy peels. That risk is one reason many Northern Illinois homeowners skip epoxy entirely for A1’s one-day polyurea and polyaspartic coatings, which use the same rigorous grinding but cure in hours instead of days.
Either way, the prep is the part you are really paying for. When A1 quotes a garage floor, diamond grinding, crack repair, and moisture testing are built into the quote, not billed as surprise line items.
Frequently Asked Questions
Can I put epoxy over a garage floor without grinding it first?
Putting epoxy over a garage floor without grinding it first is the fastest way to a failed coating, because the smooth or contaminated surface gives the epoxy nothing to grip. Diamond grinding opens the concrete’s pores and removes sealers, laitance, and old paint so the coating can bond mechanically. Acid etching is a weaker substitute that professional installers have largely moved away from.
How do I know if my garage slab has a moisture problem?
You can spot a possible garage slab moisture problem through signs like white efflorescence, damp patches, or a previous coating that bubbled and peeled, common in older Evanston and North Shore garages where decades-old slabs sit on damp soil without a modern vapor barrier. The reliable way to confirm it is a calcium chloride or relative-humidity test that measures how much vapor is moving through the concrete. If the readings are high, a vapor-barrier primer goes down before the epoxy to keep it from delaminating.
How long does garage floor prep take before epoxy can be applied?
Garage floor prep usually takes several hours to a full day before epoxy goes on, depending on the slab’s size and condition. Grinding, crack repair, and cleanup happen first, and any moisture mitigation adds time. A1’s fast-curing systems often let the prep and coating finish within a single day, while a slow-cure epoxy can stretch the same job across several.
Professional Prep Means a Durable Garage Floor
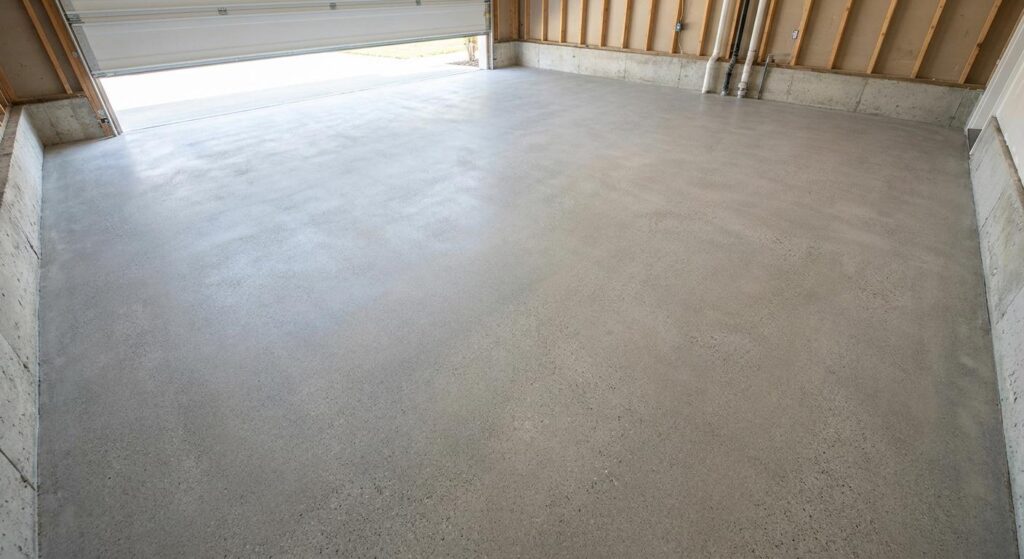
A beautiful, resilient garage floor is ultimately won or lost before the first layer of coating is ever applied. A meticulous foundation of mechanical diamond grinding, deep crack repair, and rigorous moisture testing is what separates a floor that looks great for decades from a temporary fix that peels under your tires by spring.
A1 Concrete Coatings refuses to cut corners on this groundwork, ensuring your new floor withstands daily wear and tear. If you want to skip the intense labor and ensure your garage slab is prepped and coated correctly, contact A1 Concrete Coatings at (866) 212-6284.

Under the direction of founder Luis Contreras, A1 Concrete Coatings provides various types of concrete coatings, including flake floors, solid concrete dyes, polished concrete floors, metallic epoxy floors, quartz epoxy floors, and urethane cement-coated floors. Louis and Angie Contreras built A1 Concrete Coatings from the ground up. Louis runs every job: handling estimates, leading installs, and ensuring each floor meets the standards the company was built on.